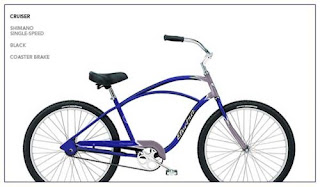
About 5 years ago, in Eugene, Oregon, I purchased an Electra Cruiser Coaster bicycle for about a hundred bucks from a friend. I loved
that bike, and rode it everywhere in that college town - getting many compiments each time I'd take it out. It was electric blue with grey and white accents, with
wide handlebars. For having only one speed, it was fast, too.
Riding that Electra was a huge esteem booster. I felt cool and hip - "Wow, look at Molly on her rad cruiser!"
In September of 2006, I moved to Dallas, Texas, and was forced to leave my beloved bicycle in Eugene as I was unable to take it on the plane with me. I had been living at a campus student co-op house, so I sold it to a friend for$80 - the condition being that someday, I would come back for it.

Years passed, and that friend ended up moving to St. Croix island - I realized that she had left the bike behind at the Co-op in Eugene. I decided to try to track it down.
I emailed the few people I knew for sure still lived at the co-op, and they promised to help me get the bike back - however, none of them would give me an accurate description of what the bike looked like. After all, I didn't want to pay to have it shipped down to Texas if it was completely trashed!
Finally, after nearly two months of trying desperately to get someone to tell me what the bike looked like, one of them came through and sent me two pictures of it:
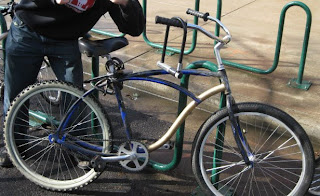
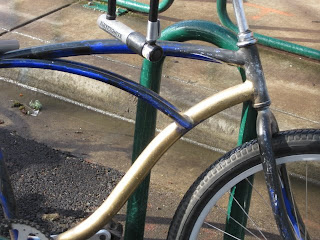
Good Lord! What in the hell happened to it? Obviously, it had been used as a "house bike" at the co-op. Various people had painted it various colors, including a metallic gold and splotchy, spotted black spraypaint. There were scrapes and scratches everywhere - it looked as if the tires were mismatched. The kickstand was broken off. The front chrome "Electra" badge was missing. It was a nightmare...
But I still wanted it back. It was calling to me, as if it were sick and saying "Help me, Molly! Save me from these mistreating hippies!"
Judging from how long it took to get someone there to write a mere email to me, I figured the chances of getting someone to physically take the bike to a Fed Ex store were slim to none. So, I posted an ad on Craig's List, asking if anyone was travelling from Oregon to the Dallas area. I did not expect to get a reply, and frankly thought the chances of being reunited with my bike were looking bleak.
To my surprise, a couple weeks later I got a reply. A man from Sandy, Oregon was going to be driving to Sherman, Texas (which is only a half hour north of where we live). Since Eugene is a bit out of his way, he said he would do it for $50. Deal.
Before I knew it, we were going to pick up my bike from this man. My boyfriend and I met him at a Sonic restaurant, where we paid him and put the bike in the trunk of the car with the seats folded down. I was so excited! But, at the same time, I knew I had my work cut out for me. Not only was the paint bad - the front tire was flat, and there was a large bike lock around the frame.

Prepping for Paint
The first order of business was to fix the flat tire. Having never fixed one before, I went through a bit of trial and error. One of the nuts wouldn't come off, so I tried to fix the tube without taking the wheel off of the bike - big mistake. There's no way that could work. I got help loosening the nut, took the tube out, aired it up with my boyfriend's bike pump, and took it up to the bathtub in our apartment. I had heard of using this method but never tried it. I filled the bathtub a few inches and submersed the tube - viola! A trail of tiny bubbles rapidly escaped from a practially microscopic hole. After drying the tube, I used a patch kit and easily fixed the tube.
The next thing to do was to get that damn lock off the frame. It was one of those thick wire locks that coils up. After trying a few various small handtools, I went to my mother's house and borrowed two hacksaws. These allowed me to get through the thick rubber coating and through about a quarter of the woven copper wires. Eventually, I was able to tear through the rest of it using a pair of heavy-duty wire cutters.
After unscrewing what was left of the broken kickstand, I installed the new kickstand - an adjustable chrome stand with a rubber foot.
Next came the sanding of the crappy hippie paintjob. Using wet/dry sandpaper, I sanded the entire frame, using up less than a full sheet of the stuff. I sanded until the finish was smooth to the touch - however, the pinstripe decals were still visible. That's okay, though - I planned to use them as guidelines for the new stripes.
I then used some wide masking tape (again, borrowed from my mom) and taped off any chrome parts, including the chrome on the back wheel. I didn't take off the back wheel for two reasons: A. I didn't want to mess with the chain, since I'm not a bicycle expert (I didn't want to take anything apart that I couldn't put back together again!) and B. For some reason, the rubber on the rear wheel had turned a yellowish-white in many places. I don't know if someone rode through some weird crap, or if the rubber is old and fading - either way, I wanted to go ahead and hit it with the black paint.
Paint!
I opted for a shimmery black paint, using a paint pen for the red pinstripes/decals, and lots of clear coat for that candy-paint finish. I figured the black would look good with the red (those are my favorite colors, anyway), and that the black would cover any mistakes I made.
Most of the websites I looked at strongly recommended primer before paint. However, being on a budget (this
is a recession, right?) I decided to just sand the frame
as best I could, and the fact that I was going black, I figured there wasn't much point to putting primer on. I only hoped thatI wouldn't be proven wrong!
I used an old toothbrush to brush away any debris or oil from around the pedals and chain area, and began to paint, using short, brisk sweeps. At first it seemed as though the paint was extremely light, until I went over it a few times and it began to darken. I flipped the bike upside down and thoroughly painted every angle.


I used a red paint pen while it was very sunny out so that I could make out where all the decals were, and followed them. I have a steady hand when it comes to painting like this, so it wasn't a problem - had I not, I would have taped off the parts where I wanted the red paint to ensure straight lines.

I had to go over the red paint many times in order to hide my brush strokes. This may or may not have been avoided by using a different method of painting, but it did turn out exactly like I had imagined it would.
At the same time that I was working on the rest of the bike, I was also busy creating a special custom feature:
Dice Valve Caps
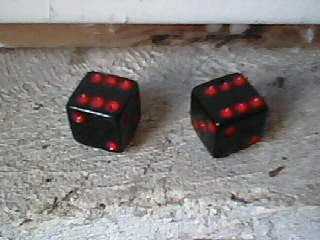
One rainy day, I went to my mom's house and used her drill in her toolshed to bore holes into 2 regular, 6-sided dice. I secured the dice in a vice and, starting with the smallest drill bit, I carefully drilled about a half-inch into the side with the "one" dot - which worked out great because the dot acted as a guide for the drill.
I graduated up to a bit size that was slightly larger than the diameter of the valve caps. With a drop of gorilla glue in each hole (a little goes a long way!), I tapped the valve caps into the dice with a hammer. I used a black paint pen to paint the dice, and a red one to color in the dots. Now I have a sleek, cool accent on each wheel.


